Due to the high vulnerability of shower floor to mildew and mold, you may need to re-tile your shower floor as often as necessary to prevent your tiles from becoming stained and discolored. Here’s how to retile a shower floor to revamp it and stop it from looking worn and ugly.
Read: How to repair cracked floor tile
How to Retile A Shower Floor
Table of Contents
Remove Old Tiles
Start by removing the old shower tiles. Take out the grout using a putty knife or any grout removing tool, you can choose to reuse the ceramic tiles on other areas of the home after taking them out but make sure to clean them properly first.
After removing the grout, you can gently pry up the ceramic tile. Do this by sliding the putty knife underneath the tile as far as you can and pry them loose. Most of the tiles should come up easily.
If any tile does not come up easily, you can apply a little more pressure. Be very careful with this process to avoid breaking your ceramic tiles into pieces.
You can use a small hammer to gently tap on the putty knife to pry up tougher tiles. After removing the first tile, the rest should come off easily.
Read: How to remove ceramic floor tile from plywood
Inspect the Base Floor
After removing all of the old tiles, inspect the base floor of the shower and check for any leftover adhesives. You can remove any leftover adhesive by scrubbing the floor with a scrub brush and commercial paint remover.
Make sure that the base floor is completely even and free of any tile adhesive before beginning the retiling process. A smooth surface will make the new tiles adhere better to the floor.
Continue scrubbing off leftover adhesive until you achieve a clean and smooth base floor.
Read: How to steam clean concrete floors
Inspect the Water Barrier
After removing the adhesives properly, check out the state of the water barrier on the shower floor. The water barrier is a thin layer of materials that helps to prevent water from penetrating the base of the shower floor.
If your water barrier is still in good condition, you can continue with the procedure but if the water barrier is damaged or broken, it needs to be fixed or replaced before moving on to the next step in the process.
Apply the Thinset Mortar
After purchasing the thinset mortar mix it according to the manufacturer’s instructions. Once the mixture has been completely mixed, you can begin applying even coats of the thinset mortar to the area of the floor where you intend to install the new tiles.
After applying the thinset mortar allow it to sit for no more than 15 minutes before installing the tiles. Only apply the thinset mortar when you are ready to install the tiles and on a small portion of the floor at a time. Do not apply the thinset mortar to the entire floor all at once.
Install the New Tiles
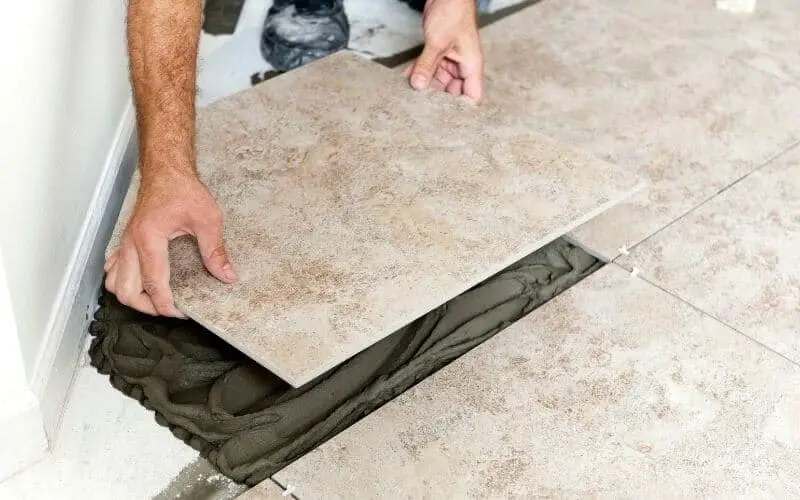
Before installing the tiles, use an old comb to run over the thinset mortar, this will give the tiles a much better chance of adhering much better to the thinset mortar than when it is flat. You want to ensure the tiles adhere as securely and flatly as possible to the floor.
Gently tap the tiles into place as you lay the rows of tiles over the coarse thinset mortar. Tap them gently using a small hammer. You can also place a flat board over the top of the tiles to apply more even pressure when pressing the tiles down to ensure that they rest on the adhesive properly.
Read: How to clean textured shower floor
Use Tile Spacers
You want to install the new tiles as evenly as possible this is why you may need a tile spacer which you can purchase from a local hardware store. They are very affordable and will ensure a seamless tile installation.
Use a tile spacer to lay down all of the tiles in a row and check for any anomalies that may have occurred, making any necessary corrections.
Do this one row at a time to prevent the thinset mortar from setting before you can install the new tiles. This not only leads to wastage of useful materials but will also make the job take much longer than necessary.
Read: How to fix loose tiles
Create a Shower Tile Installation Pattern
- Create An Asymmetrical Design
To give your shower floor a beautiful aesthetic you can create an asymmetrical design that is like a mosaic or a jig-saw puzzle. It requires a lot of planning and tile laying skills to ensure that the tile is properly laid. It may take a longer time to do, but it will give your floor a unique appeal that can be quite unmatchable.
- Grid Pattern
If you want a more intricate and complex design you will need to grid everything out first. Use a grid paper to draft out the design down if possible. Grid paper is usually already marked out into individual squares, this makes it easier to map out and work with any geographical shape you may want.
Scale the grid paper to the proper size of the shower flooring so you can achieve accurate markings and set the rest of the design out over the grid paper.
When installing the tile, make sure to follow the grid to ensure evenness and accuracy throughout the process. Do not deviate at any point to avoid discrepancies and unevenness which may ruin the design you are going for.
Read: How to clean a pebble stone shower floor
Finish Up
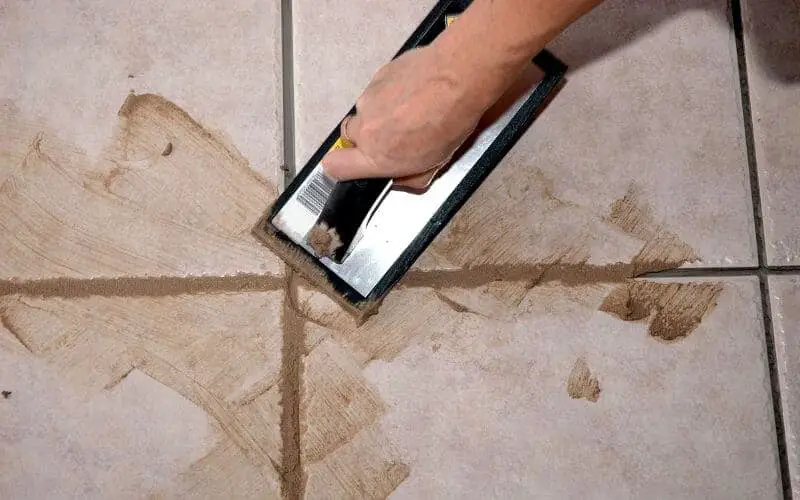
Once the thinset mortar is completely dry you can apply the tile grout. Apply the grout of choice according to the manufacturer’s instructions to avoid any mishaps or issues with the grout itself.
Apply the grout using a grouting towel to each of the spaces that separate the tiles. Use a wet sponge to wipe off any excess grout. When the grout is applied to the entirety of the floor, clean it up, and your shower tile is ready for use.
Read: How to clean shower floor
Tips For Retiling Your Floors
- Always opt for big tiles, bigger tiles are easier to install and they are common for bathroom and kitchen walls but they might not be too great.
- Do not skip over any uneven area of the floor. It is dangerous and could hurt you, plus an uneven subfloor will cause the installation to not be successful. To level your base floor, you can use a self-leveling compound and it’s very easy to install. You can also make use of plywood or cement backer.
- To cut your tiles, you can rent a wet saw beforehand. This will enable you to cut the tiles perfectly without shattering them. You can rent or purchase a wet saw from any home improvement store.
- When installing your tiles, do not be in an excess hurry. Take your time and ensure you get everything right. Rushing the installation will only cause you to make mistakes that you will need to go back and fix later on. So try to get it right on the first try than looking for a way to fix it.
- If your trowel happens to accidentally get jammed in a corner or edge of the floor, you can put some adhesive on the back of the tiles to “butter” it up and the trowel should slip right out.
Read: How to cut vinyl floor tile around a toilet
Conclusion
This article is here to guide you on how to retile a shower floor, which is needed whenever your floor has been infiltrated with mold and mildew.
When retiling your shower floor, there are different designs and patterns you can follow so that your floor has a beautiful aesthetic and finish. Follow the instructions in this article to properly retile your shower, and you will be glad you did.