If your laminate floor has seen its best of years and starting to look old and worn out, there’s actually a way to revamp your laminate floor and bring it back to life; by staining.
Asides from old age, other factors like trying to make your laminate wood darker to cover any stains that have been set in the finish or simply to match new room décor will require you to stain your floor.
Staining laminate floor is easier than it seems, and this article is here to guide you through it.
Read: How to remove adhesive from laminate floor
Staining Laminate Floors
Table of Contents
Clean Your Floor
Before staining your floor, you will need to wash it thoroughly. This will enable the stain to adhere better to the laminate floor. Sweep and mop the entirety of the floor, getting into every corner and removing any visible dust or debris
Fix Any Damage
Inspect your laminate floor for any signs of dents, cracks, or chips. If there’s any sign of damage, you should fix them before staining. For minor damages, fill your laminate floor with patching material or replace the planks if it’s excessively damaged.
Sand The Floor
With 220-grit sandpaper, sand the floor Using light pressure. Sand the floor surface in a circular motion in order to smooth out any small bumps or imperfections
Sanding the floor is very important and will give your floor a little grit so that the stain can adhere to the floor’s surface better.
Instead of sandpaper, you can use a sanding block or orbital sander to speed up the sanding process.
Clean Up Any Residual Sandpaper Dust
After sanding the floor, you would need to wipe off any dust and debris generated during the process. Use a damp washcloth for this and after removing any dust left behind by the sandpaper, Use a dry washcloth to wipe off any excess water left on the floor before applying any stains.
Your laminate floor needs to be completely dry before being stained.
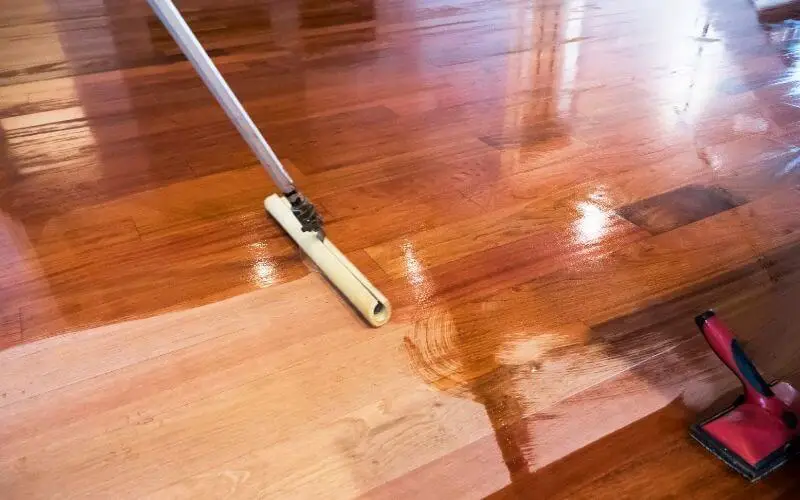
Apply your Laminate Floor Finish
When buying laminate floor finish, you need to remember that traditional wood stains do not work on laminate floor, so opt for a floor finish with a rich, warm color that works on laminate floor. Laminate floor is less absorbent than wood; this is why it needs specialized floor finishes.
Apply the laminate finish to floor sections with a washcloth
Using a washcloth soaked in the floor finish, apply the protective finish to the floor using thin, even strokes. Cover small sections of the floor at a time before moving on to the next section
To get an even glossy finish, use the washcloth to smooth any noticed stroke lines. After applying the first application to the first section, you can inspect the color and decide if you like it before finishing the entire floor.
Apply The Laminate Finish To The Entire Floor.
After applying the finish to the first section of the floor, allow it to dry for 30-60 minutes before repeating the process with the next section. Try to work your way from the back of the room towards the front; this will prevent smudging of the laminate finish before it dries completely.
Apply Additional Coats Of Laminate Finish
After applying the first coat, allow it to dry for at least 2 hours before adding extra coats in order to achieve a richer color and longer-lasting finish.
The number of coats you need to apply depends on how dark you want the finish to be. Continue applying coats of laminate finish until you achieve your desired color; ensure to wait 2 hours between each coat.
Allow the Finish To Cure For 48-72 Hours
After applying the final finish coat, allow it to dry and cure for at least 2-3 days. Keep off the floor for this time frame to Avoid leaving streaks or smudges on it,
Staining Hardwood Floors
Like laminate floor, staining hardwood floors is quite simple; here’s our to do it;
Step 1
Start by moving everything out of your room. Take out all furniture, and if the room has baseboards, remove the quarter-round shoe moldings that mark the transition between the baseboard and the floor with a pry bar.
Also, cover the doorways with plastic sheeting or old sheets so that the dust generated during the floor sanding does not get beyond the work area. You can also cover any light fixtures or HVAC vents before sanding.
Step 2
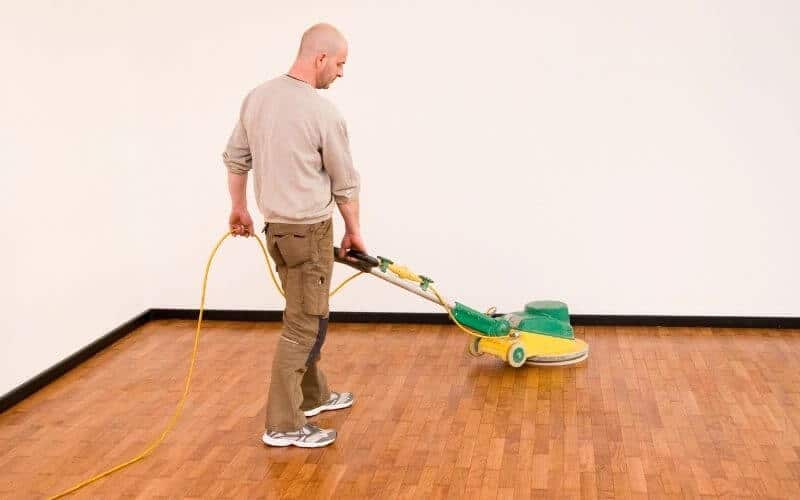
How well you carry out the sanding process has a huge impact on the overall turnout of the end result. If your floor is not sanded properly, it will be noticeable once the stain dries. If you are staining a large area, you will need to get a large sanding tool in order to get the work done quicker.
You would need a tool like a waist-height random orbital sander which is readily available for rent at your local home center. An orbital sander is usually user-friendly and poses little risk of damaging your floor; you only need to read and follow the operating instructions provided with the unit.
After getting your sander, you will need to sand the floor three times, using a lighter-grit abrasive with each pass. Start by setting up the sander with 60-grit sandpaper and move it across the floor.
Please don protective eyewear and a dust mask before you begin this procedure. Using a sander is similar fashion mowing the lawn: Sand, the floor in rows, go over each row multiple times by approximately half the width of the sander.
After completing the first round, swap in 80-grit sandpaper and repeat the process. Finally, switch to 100- or 120-grit abrasive and go over the floor one more time.
If you encounter any area too small for the random orbital sander to reach, you can use a palm sander or a detail sander to achieve your desired level of smoothness.
Read: How to fix uneven stain on hardwood floor
Step 3
After sanding down the floor, you will need to vacuum up the dust generated during the sanding procedure thoroughly. A regular household vacuum may not be up to the task.
So opt for a heavy-duty shop vac, and it should be fitted with a brush attachment and also a new filter. After vacuuming the floor and getting rid of every single speck of dust, use a clean rag that has been soaked mineral spirits to wipe down the floor until it’s clean and every residual dust is removed. This is quite a tough task but pays really well in the end, so do not try to skip it if you want a beautiful result.
Step 4
Now it is time to stain; remember to keep your working area well ventilated; floor finishes can emit vapors that are harmful to inhale. Before applying the stain, map out the work route that will ensure that when the floor has been freshly stained, you’ll be able to get out of the area without having to step all over your work.
It’s usually recommended to start in one of the corners opposite the door and work your way towards the exit. Once you’ve gotten a suitable working path, you can start staining.
Apply the stain to the floor using a lambswool applicator, ensure to evenly distribute the stain over one two-foot section at a time.
Remove excess stain using a rag, then move on to the next section. When staining your floor, do not let the “wet edge” dry. Instead, start the applicator a few feet away from the edge, and maneuver it to meet the previously coated section.
For closed-off corners or the area where the floor meets the baseboards, you can use a two-inch paintbrush as the applicator.
When the stain is dry, you get to see its actual color, and you can decide if you like the color or want it darker. If you want it darker, you can go ahead and apply a second coat using the same procedure as the first.
Read: How to lighten stained wood
Step 5
When the stain is completely dry, it’s time to apply a polyurethane sealer to protect the finish. You can do this Using a high-density foam roller and a two-inch brush for hard-to-reach areas. Apply a thin and even coat of sealer across the entire floor surface.
Remove any excess finish and allow it to dry to a glassy finish. Depending on the type of sealer you’re using, you may need to sand your floor between coats or simply proceed directly to the second application of polyurethane. If your sealer requires sanding,
you can use a 320-grit abrasive to sand the floor in order to ensure that the second coat properly adheres. Do not make use of an orbital sander for this process; Instead, sand either by hand or with a sanding pole.
After cleaning up the dust generated from the sanding, apply the second, final coat of sealer and allow it dry. After applying the seal, allow it to dry for at least 24 hours before walking on the floor again and as long as 72 hours before you return the furniture in the room.
Read: How to refinish pine floors
Conclusion
Laminate and hardwood floors are one of the most common types of flooring in many homes. It’s no surprise why as they are both beautiful types of floors.
But after a while, that beauty may begin to fade due to wear and tear. So what do you do? Staining laminate floors or staining hardwood floors is quite easy and will restore your floor’s beauty.