Vinyl plank flooring is also known as luxury vinyl and it is one of the simplest types of flooring to install. This is one of the reasons why DIY homeowners tend to seek after it.
There isn’t a definite answer to that question but you can cover a moderate-sized room with vinyl plank flooring in just a few hours.
How long it will take you depends on the size of the room, how many people undertaking the project, and your level of expertise. All this and many other factors determine how long it takes to install a vinyl floor tile.
Read: Easy homemade vinyl floor cleaner
How to Install Vinyl Floor Tile
Table of Contents
Plan Out The Floor Layout
regardless of the type of flooring you are opting for, you will want the layout to be eye-catching in a good way.
To achieve this, you need to start working from the most visible wall most especially the one that meets your eye when you step into the room, start from that end and work your way towards the entryway.
If you are installing the vinyl tile In a small bathroom, then the row that will be most visible will be the ones that run alongside the bathtub.
When installing your vinyl tiles, lay the first row of planks parallel to this most prominent wall or feature in the room, and work your way across the room.
Because of the fact that most rooms are not truly squares, you may find out that the last row of tiles you install will be slightly uneven. But the baseboards or shoe moldings will covet up this unevenness.
You may need to stagger rows so that the end joints do not fall at the same point as the adjacent rows. Most manufacturers usually recommend that end seams be set off at least 6 inches from each row.
When laying your vinyl tiles opt for a layout that makes most of the number of whole tiles and the size of cut you would need to make on any tile.
For unavoidable small sized tiles, you can try placing them in areas where they will be covered by furniture or vanities, or you can simply keep them out of main sightlines.
Read: How to repair scratches on vinyl tile
Removing the Trim
Removing the trim that makes contact with the floor will make the whole installation process easier. this often includes baseboards, base shoe moldings, and case moldings around doors.
You may also have to remove your door from their hinges as it also helps to ease the installation process.
Removing Door case molding gives you a clean installation and they are also quite easy to remove and replace. In cases where you have unremovable protrusions or you probably don’t want to remove the door trim, you can simply cut the vinyl tile to fit around these obstacles.
The thin brad-like nails that are usually used to attach the Trim molding can be removed by carefully prying it off with a flat pry bar. You can use pliers To remove the brads from the trim by pulling them straight through the molding from the backside.
If after removing the trim and it is still in good shape, you can set it aside and re-install it after installing the floor.
Read: How to cut Vinyl around a toilet
Prepare the Subfloor
Before installing your Vinyl tile, you need to make sure the sub-floor it will be installed over is in good shape. If there’s any high spot on the floor you need to sand it down in order to create a flush surface that will be suitable for installing your new floor.
You need to create the smoothest and flattest surface possible as the underlayment for the vinyl tile floor.
If the subfloor you are laying the vinyl tile over is concrete, you will need to fill any cracks or divots with a concrete patcher, but if you have a plywood subfloor, fill any dents or depression with a floor-leveling compound.
Measure Out the Planks
Measure out the length of the wall by Testing fit the first row of vinyl tiles. The floor layout will be more pleasing to the eye if the planks are of roughly equal lengths at the opposite sidewalls.
The best way to do this is to start placing the tiles from the middles of the room, place a full plank at the center, and work your way to either side so that the cut planks at both ends of the room will be of equal length.
Allow about a 1/4-inch gap at the wall and at the ends; you can make use of spacers and place it against the walls to establish this expansion gap.
Cut Out the Planks
The method in which vinyl tiles are cut is quite similar to that of drywall panels. Start scoring through the face of the plank partially using a carpenter’s square and utility knife. Then use a knife to lightly run across the face of the plank several times instead of trying to cut it in one pass.
Due to the slippery nature of Vinyl planks, you have to be very careful when pulling back on the blade. you can also make use of a fine-tooth handsaw to cut out the vinyl plank.
After cutting straight through the plank, flip it over so that the side of the finished surface faces down and fold the plank back. This might cause the plank to snap off but if it doesn’t, you can run a utility knife lightly through the fold.
Attach the Vinyl Planks
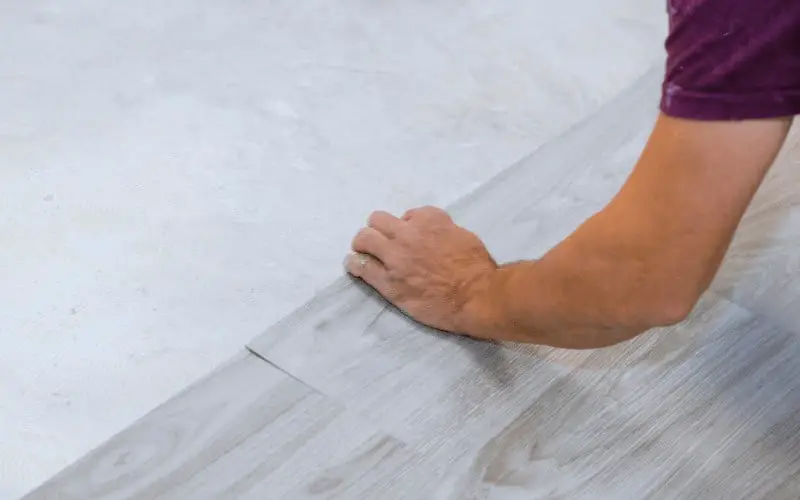
You can attach most luxury vinyl planks edge-to-edge and end-to-end because they utilize a fold-and-lock type of tongue-and-groove system. Lay One plank flat on the subfloor, and hold the other plank at an angle, and place it into the first board’s receiving groove.
To draw the board together and lock them in place, Fold the second board until it lies flat and parallel to the first board.
After laying the first row in this pattern continue the process across the floor with subsequent rows, first joining the planks end-to-end, then placing the new row along the edge of the previous row fold its tongue into the groove of the previous row.
You also need to allow at least 6 inches between the end joints in the previous row
Fit in Protrusions
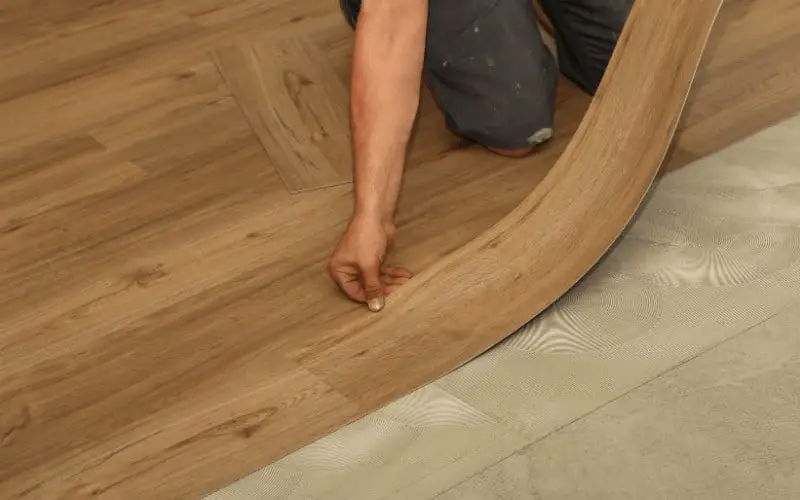
When you come across obstructions like door frames or floor ducts, you can snip the vinyl planks using tin snips or heavy-duty shop scissors until you achieve the desired shape.
After cutting the vinyl plank to fit the obstructions, attach the plank to the adjoining plank and hold the cut-out plank upward, at an angle. Then fold down the cut-out plank slowly until it locks into place with the adjoining plank.
Although Vinyl plank is flexible enough to be bent and made to fit around most protrusions, you may need to disassemble the previous planks to be able to navigate around some protrusions.
Read: Why is my Vinyl floor buckling
Fit the Last Row of Planks
For the last row of planks, you will need to trim it to fit the far wall lengthwise. You need to cut your plank narrow enough so it provides a 1/4-inch gap between the planks and the wall.
It is usually recommended to make Lengthwise cuts with a utility knife guided by a long straightedge, cut out the desired width of the plank using multiple passes of the knife.
After getting your desired width, join the planks end-to-end, then fold the tongues into the grooves of the previous row, as with previous rows. You can make use of a drawbar to tug this final narrow plank into place against the previous row if necessary.
Reinstall the Trim Moldings
After installing your vinyl tiles, it is time to reinstall any item that might have been removed like the baseboards and trim. You can attach them Manually using nail and hammer, but this can damage the trim so it is recommended to use a brad nailer.
But if you decide to do it manually, use a nail set to recess the nail heads below the trim surface. If the installation of vinyl tile raised the level of the floor you may need to trim the ends of door case moldings so it can fit the reduced space.
Read: How to tackle heavy furniture on vinyl flooring
Conclusion
Knowing how easy is it to lay vinyl floor tile will enable you to determine if you can undertake the task yourself because although vinyl flooring is easy to install, there’s still a chance of wrongly installing the floor.